JShowFlow: Control Flow Graph generator for Java code
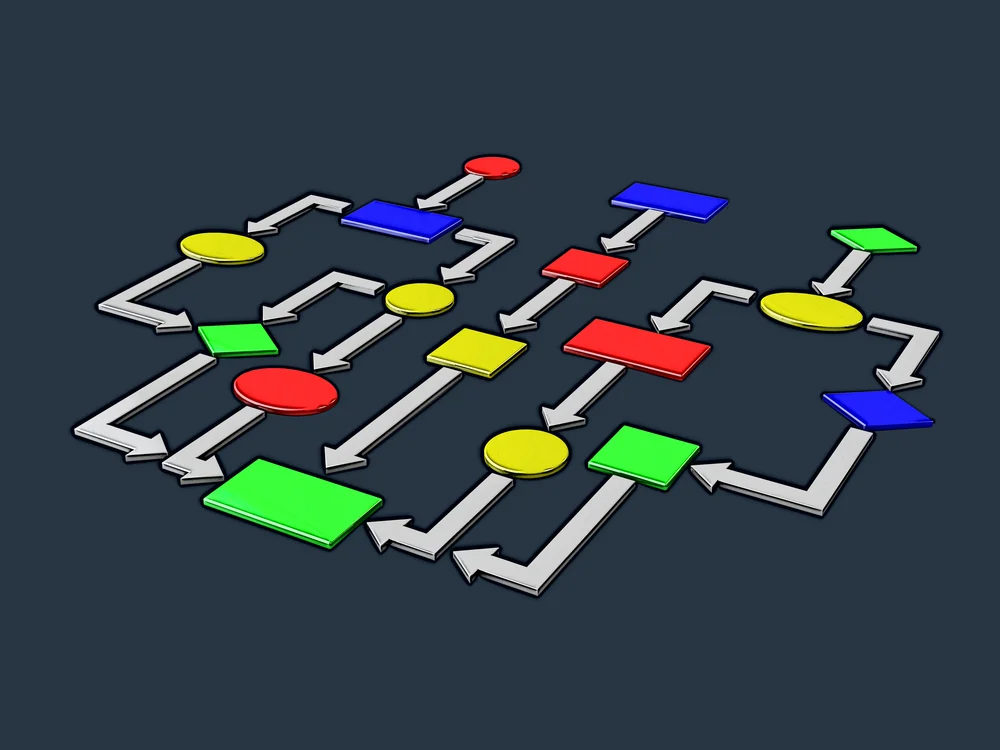
A control flow graph depicts all possible paths that a program can take during its execution.
It helps programmers analyze and understand the sequence of statements, loops, and branches, aiding in debugging, optimization, and overall code comprehension.
Creating control flow graphs from code manually can be time-consuming and error-prone, as it requires meticulous attention to detail and accurately mapping all possible paths within complex code. Additionally, any subsequent code changes may require revisiting and updating the graph, making it difficult to maintain consistency between the code and the graph representation.
Hence, I developed a tool that automates the process of generating control flow graphs based on user-provided Java code. Developing this Control Flow Graph generator was an extensive undertaking, involving careful consideration of various scenarios and resulting in approximately 6,000 lines of code. However, the effort paid off, as the tool produced visually appealing and highly practical results. On this page, I will delve into the challenges encountered and discuss the key considerations involved in the development of this program. Additionally, a downloadable PDF thesis detailing the project is available using the button below.

The program takes input files containing Java code and processes the text within them to create a custom structure using C++ structs and pointers. No external library was utilized for code interpretation as the goal was to build everything from scratch. With this structure, the program identifies the necessary elements for drawing, including arrow starting and end points, arrow labels, and determining unreachable code that can be omitted. This information is then formatted into a file using the DOT language format. Finally, the DOT file is transformed into an image in either PNG or SVG format.
The two most challenging aspects of this process were:
- Mastering the code interpretation to construct the appropriate structure.
- Determining what to draw, taking all possible scenarios and complex exceptions into account.
While the research in the PDF provides comprehensive details on both aspects, this page will primarily focus on the second part, as it showcases the most intriguing aspects of the project.
Below, you'll find a selection of images generated by JShowFlow using the provided Java code. These examples represent just a glimpse of JShowFlow's capabilities, as it can produce much more complex graphs. For a more comprehensive collection of examples, please consult the accompanying PDF file.
If
if(x < 10){
  x++;
}
x = 2;

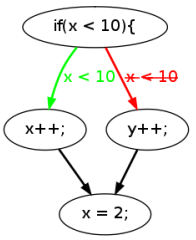
If...else
if(x < 10){
  x++;
}
else{
  y++;
}
x = 2;
If...else if...else
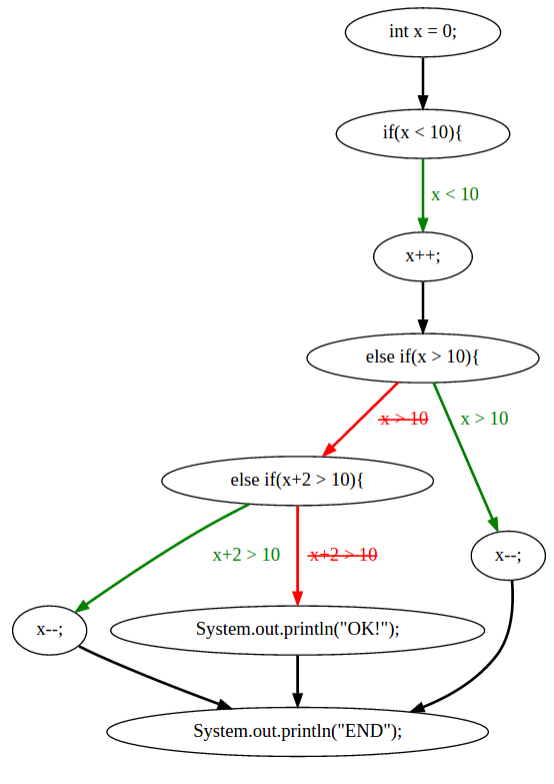
int x = 0;
if(x < 10){
    x++;
else if(x > 10){
    x--;
}
else if(x+2 > 10){
    x--;
}
else{
    System.out.println("OK!");
}
System.out.println("END");
Empty statements
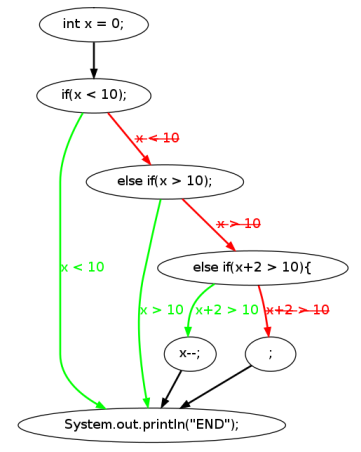
Java can have empty statements, such as the else if in the code below. It does not have brackets with code in it.
int x = 0;
if(x < 10);
else if(x > 10);
else if(x+2 > 10){
    x--;
}
else;
System.out.println("END");
The program needs to be able to deal with this scenario. And it is:
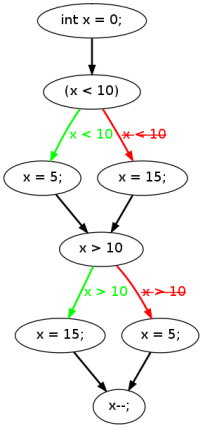
Ternary expression
int x = 0;
x = (x < 10)? 5 : 15;
x = x > 10? 15 : 5;
x--;
Ternary return
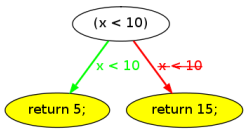
return (x < 10)? 5 : 15;
For loops and while loops
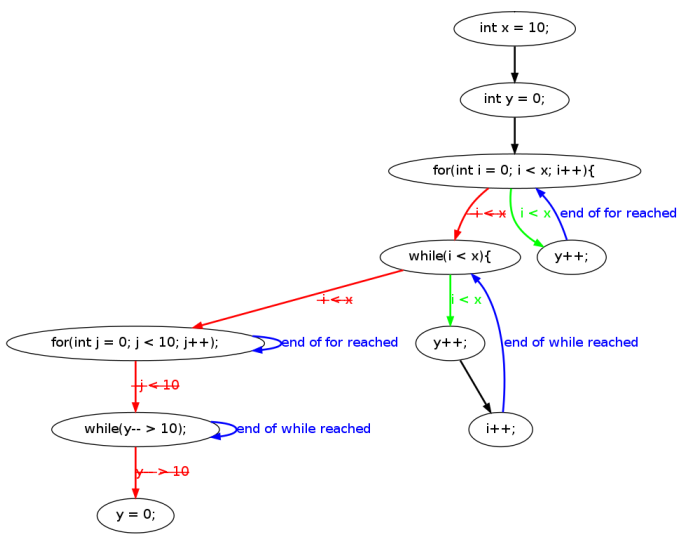
int x = 10;
int y = 0;
for(int i = 0; i < x; i++){
    y++;
}
while(i < x){
    y++;
    i++;
}
for(int j = 0; j < 10; j++);
while(y-- > 10);
y = 0;
Multiple arrows back to the beginning of loop
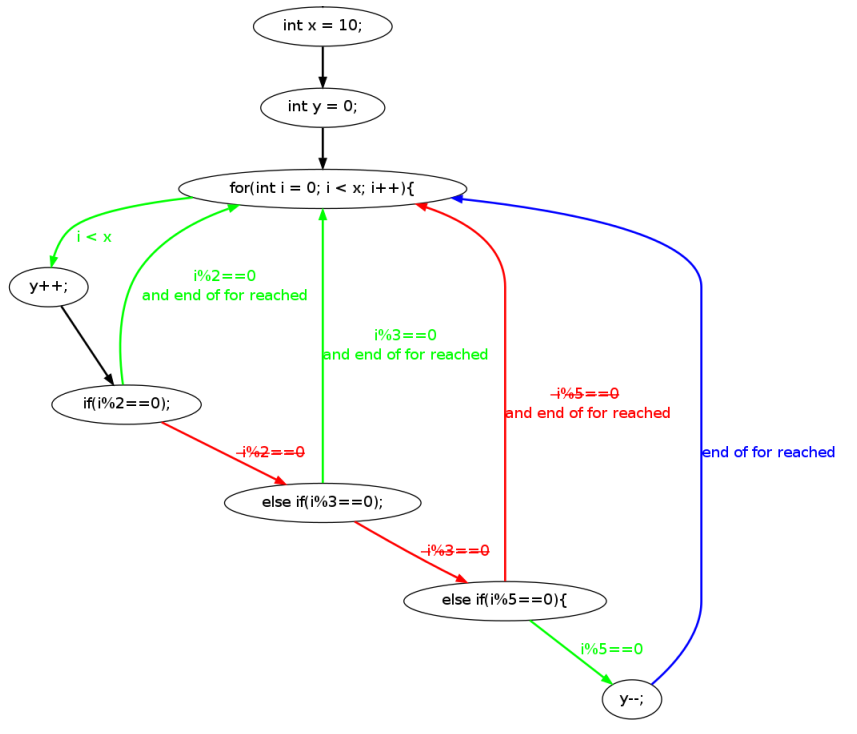
In the provided image, you'll notice the presence of a blue arrow indicating the loop's final item, which points back to the corresponding "for" or "while" statement to signify its looping nature. Typically, there is a single blue arrow by default. However, this may not always be the case. It is also possible that we need multiple arrows, or different colored arrows back to the beginning of the loop. Consider the code below:
int x = 10;
int y = 0;
for(int i = 0; i < x; i++){
 y++;
 if(i%2==0);
 else if(i%3==0);
 else if(i%5==0){
	 y--;
 }
}
In this code, it is possible that the if or any of the else if statements is the last item in the loop. But drawing a blue arrow from those items back to the for statement is not accurate, because they might not be the last item in the loop. In this complex case, we will therefore use on of the arrows of the (else) if statement itself to point back to beginning of the loop. The if statement and the first else if are only the last item in the loop if their condition is true, which is why we use their green arrow to point back to the for statement. For the second else if, it is the opposite: it is only the last item in the loop if its condition does not hold. We therefore use its red arrow to point back to the for loop. If its condition does hold, y-- will be the last item in the loop. Since that is a regular statement, we can use a blue arrow again. Therefore, the graph looks like this:
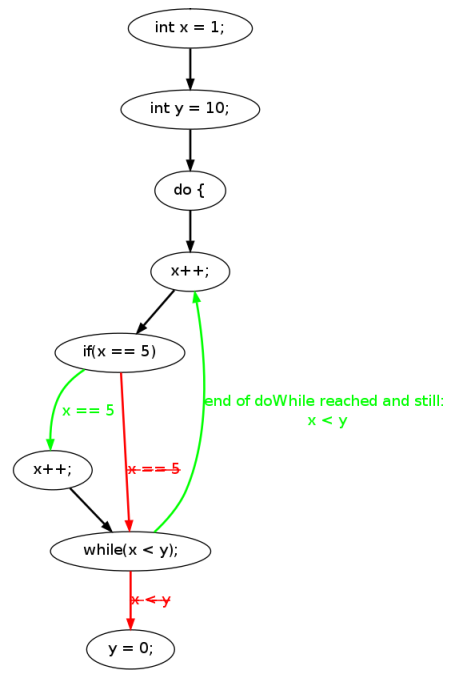
Do...while
int x = 1;
int y = 10;
do {
    x++;
    if(x == 5)
        x++;
} while(x < y);
y = 0;
Switch
int x = 0;
switch(x){
	case 1:
		x += 1;
	case 2:
		x += 2;
		break;
	case 3:
		x += 3;
	default:
		x += x;
}
x++;

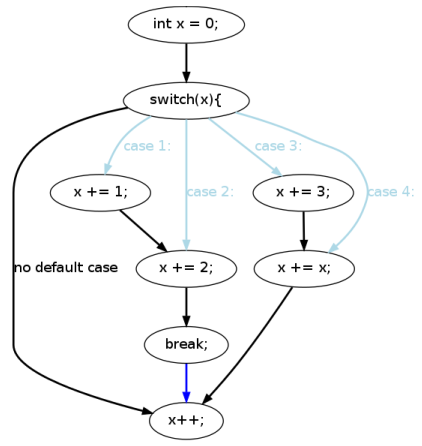
Switch without default
Consider the same code as above, but without a default case.
int x = 0;
switch(x){
	case 1:
		x += 1;
	case 2:
		x += 2;
		break;
	case 3:
		x += 3;
}
x++;
It is important to take this scenario into account as well, because we now need to introducte an extra arrow to show the control flow from the switch statement directly to "x++;" in case none of the other cases match.
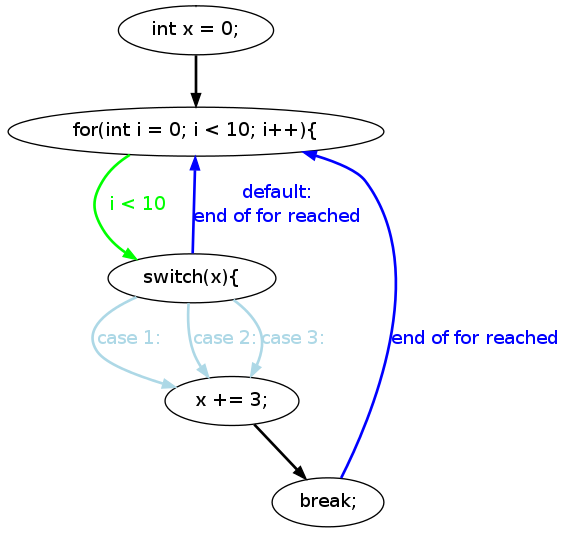
Switch with empty cases
int x = 0;
for(int i = 0; i < 10; i++){
	switch(x){
		case 1:
		case 2:
		case 3:
			x += 3;
			break;
		default:
	}
}
There is no code and no break in case 1, so it needs to point to the code in case 2. However, there is no code in case 2 either, so both case 1 and case 2 need an arrow pointing to the code in case 3.
The default case is also empty. What makes it even more complicated, is that it's the last item in a for loop. Therefore, the arrow from the default case needs to be the blue arrow that points back to the beginning of the for loop.
The break in case 3 can also be the last item in the for loop, so it needs a blue arrow as well.
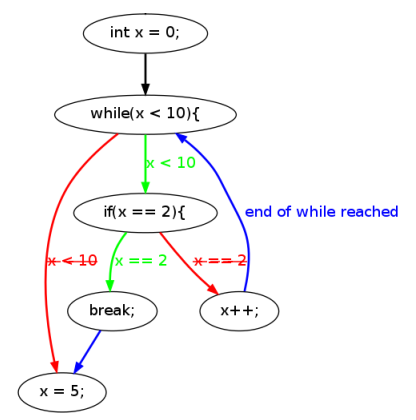
Break in a loop
int x = 0;
while(x < 10){
	if(x == 2){
		break;
	}
	x++;
}
x = 5;
Break in multiple loops
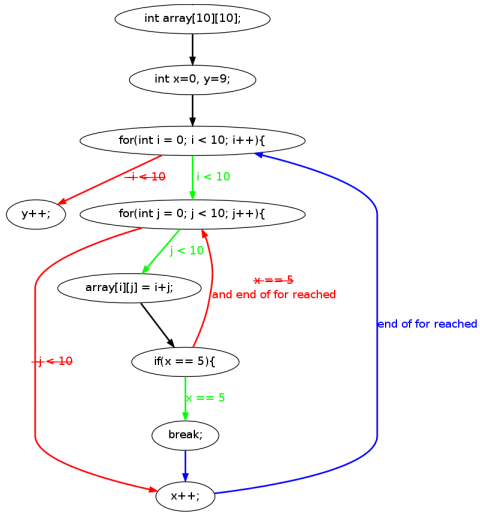
int array[10][10];
int x=0, y=9;
for(int i = 0; i < 10; i++){
	for(int j = 0; j < 10; j++){
		array[i][j] = i+j;
		if(x == 5){
			break;
		}
	}
	x++;
}
y++;
Now consider the same code, but without "x++;":
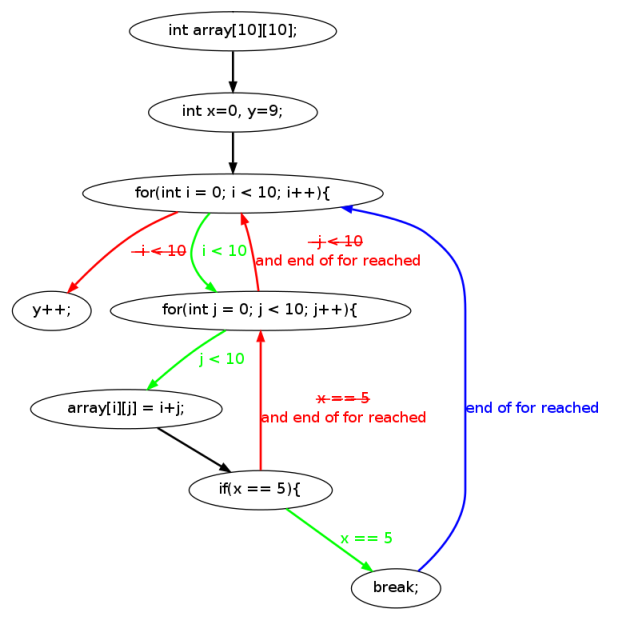
int array[10][10];
int x=0, y=9;
for(int i = 0; i < 10; i++){
	for(int j = 0; j < 10; j++){
		array[i][j] = i+j;
		if(x == 5){
			break;
		}
	}
}
y++;
This means that the break does not only break the inner loop, but when it does, it also acts as the last item in the outer for loop. But if the break statement is not executed, the inner for loop is the last item in the outer for loop if its condition is false. Therefore, that graph looks as follows:
Break in a switch
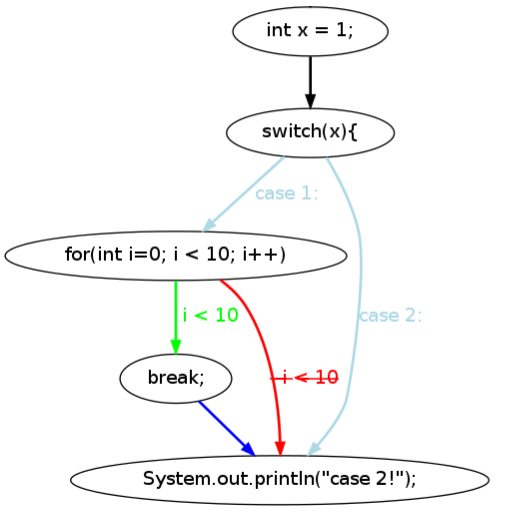
A switch can also have breaks. However, a break inside a switch can still belong to a loop. For example, consider the following code:
int x = 1;
switch(x){
	case 1:
		for(int i=0; i < 10; i++)
		break;
	case 2:
		System.out.println("case 2!");
}
At first glance, it seems like a break that ends case 1 of the switch. However, when we pay more attention, you can see that the break actually belongs to the for loop. The graph therefore looks like this:
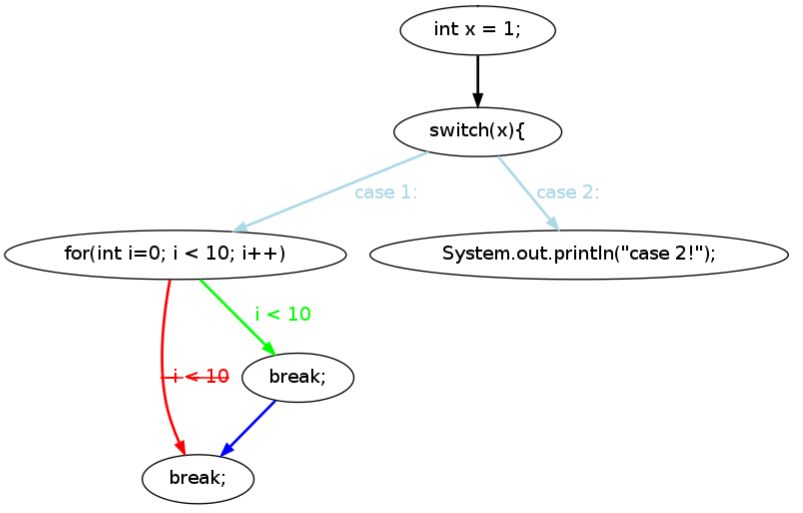
However, we can also add another break that does belong to the switch:
int x = 1;
switch(x){
	case 1:
		for(int i=0; i < 10; i++)
		break;
		break;
	case 2:
		System.out.println("case 2!");
}
The graph then looks as follows:
Breaks of a switch inside a loop
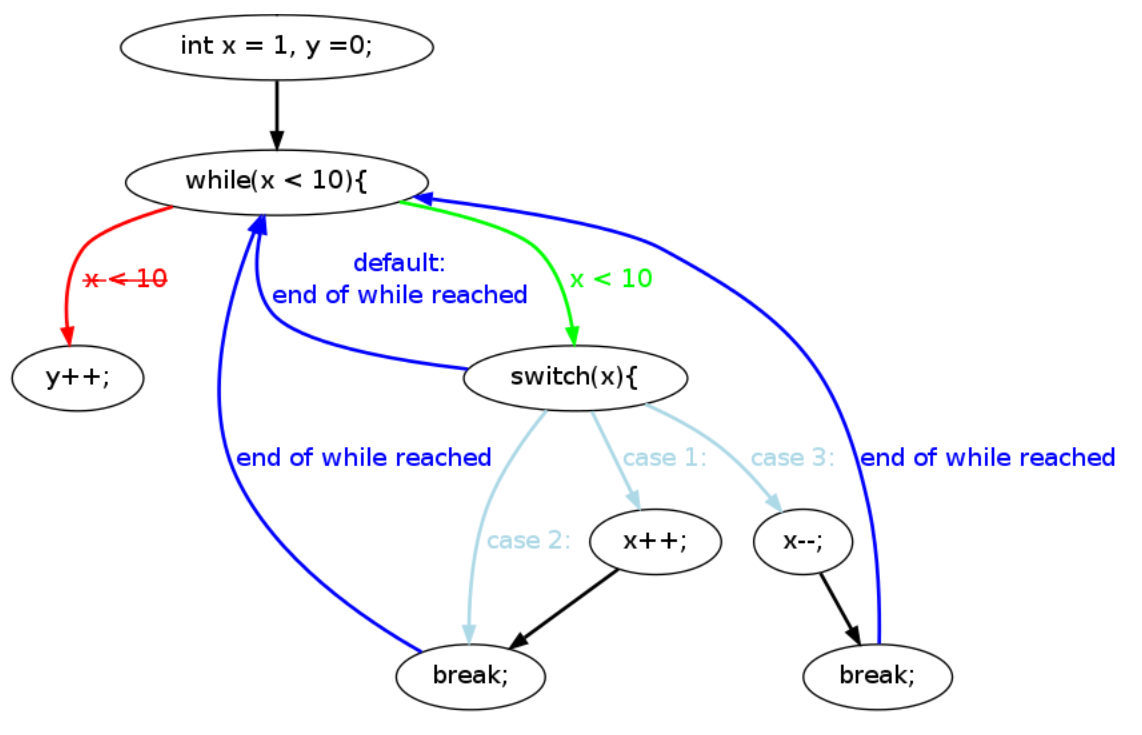
The example above shows the confusing scenario where a loop occurs inside a switch. But a switch can also occur inside a loop:
int x = 1, y =0;
while(x < 10){
	switch(x){
		case 1:
			x++;
		case 2:
			break;
		case 3:
			x--;
			break;
	}
}
y++;
In this case, every break is the last item inside the loop, so an arrow needs to be drawn from every break back to the beginning of a while loop.
Continue
int x = 0, y = 0, z=0;
for(int i = 0; i < 10; i++){
	x++;
	if(x == 4){
	   continue;
	   y = 1;
	}
	y = x + i;
	z = x + y;
}
y++;
A continue statement acts similar to how the last item in a loop acts, but it ignores anything that comes after.

Try...catch...finally
int array[]={0,1,2};
int num1 = 10, num2 = 0, result = 0;
string print = "";
try {
	//This can cause an Arithmetic Exception (divide by zero)
	result = num1/num2;
	print += "The result is|" + result;

	//This can cause an Array Index Out Of Bounds Exception
	for(int i = 0; i < 5; i++) {
		print += "The value of array is|" + array[i]);
	}
}
catch (ArrayIndexOutOfBoundsException e) {
	print += "Array is out of Bounds|" + e;
}
catch (ArithmeticException e) {
	print += "Can't divide by Zero|" + e;
}
catch(Exception e) {
	print += "Another exception occurred!|" + e;
}
finally {
	print += "This line will always be executed|";
}
print += "Done with tr-ctch-fnlly|";
System.out.println(print);
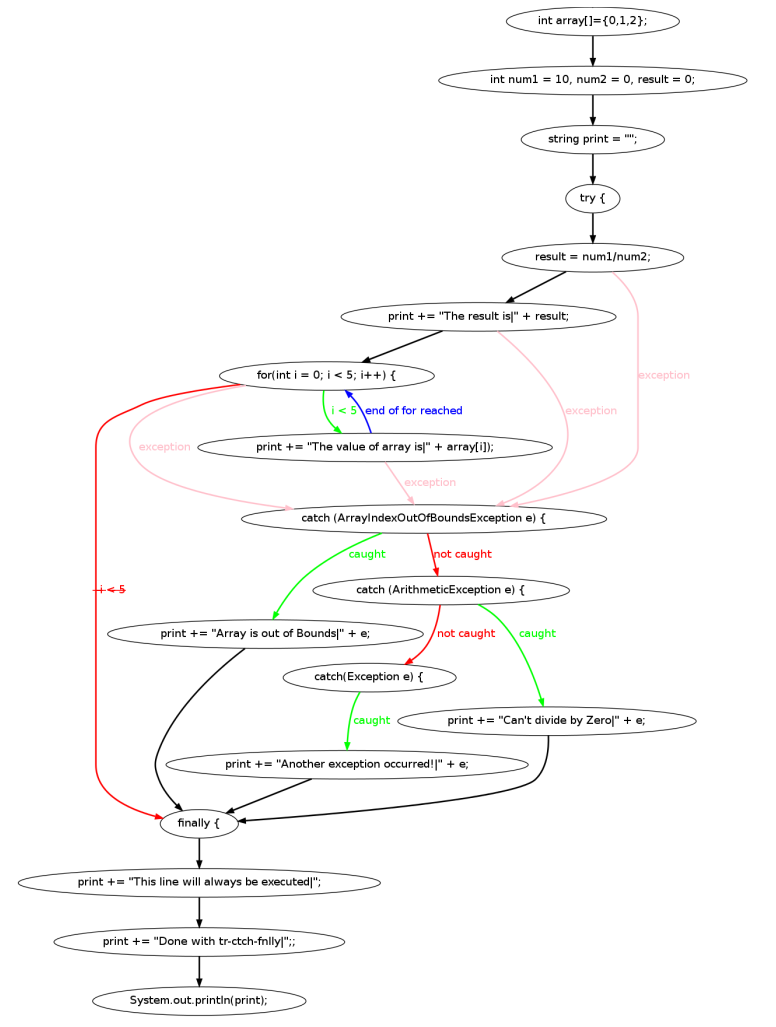
In this picture, you can notice the following:
- It is possible that an exception occurs in any statement inside the try block. That is why every statement in the try block has an "exception arrow" to the first catch block.
- The for loop is the last item inside the try block. So if no exception occurs after the for loop has finished, the control flow goes from the for loop to the finally block. This is shown by the red "false" arrow of the for loop.
- The program recognizes "catch(Exception e)" as a catch block that catches all exceptions. This means that it is impossible that the exception is not caught. This is why no red arrow should leave this node.
Ignore redundant catch blocks
The program ignores code that is never executed. An example of such unreachable code are catch blocks that appear after a catch block that already catches every possible exception.
int x;
int array[]={0,1,2};
try {
	x = array[4];
}
catch(Exception e) {
	print += "Another exception occurred!|" + e;
}
catch (ArrayIndexOutOfBoundsException e) {
	print += "Array is out of Bounds|" + e;
}
catch (ArithmeticException e) {
	print += "Can't divide by Zero|" + e;
}
finally {
	//print += "This line will always be executed|";
}
print += "Done with tr-ctch-fnlly|";
System.out.println(print);
In this code, "catch (ArrayIndexOutOfBoundsException e)" and "catch (ArithmeticException e)" will both be ignored, because those blocks will never be reached. This is because "catch(Exception e)" already catches those exceptions.
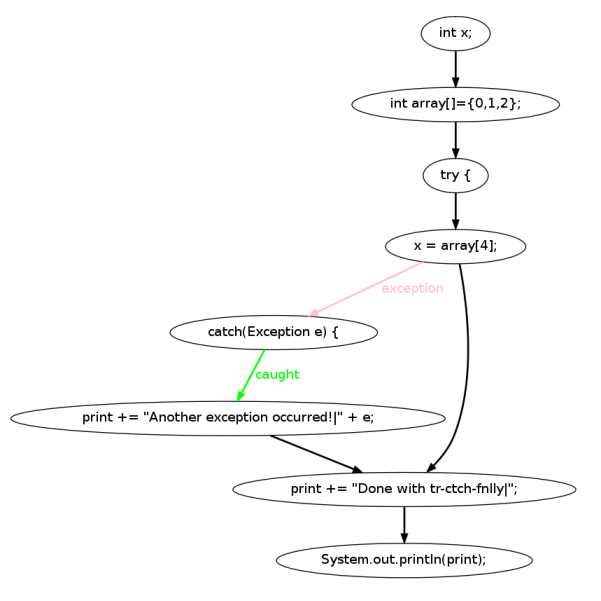
Please also note that the finally block is ignored. This is because the statement inside it has been commented out, which means that it now does not contain any executable code. It is therefore skipped.
No matching catch
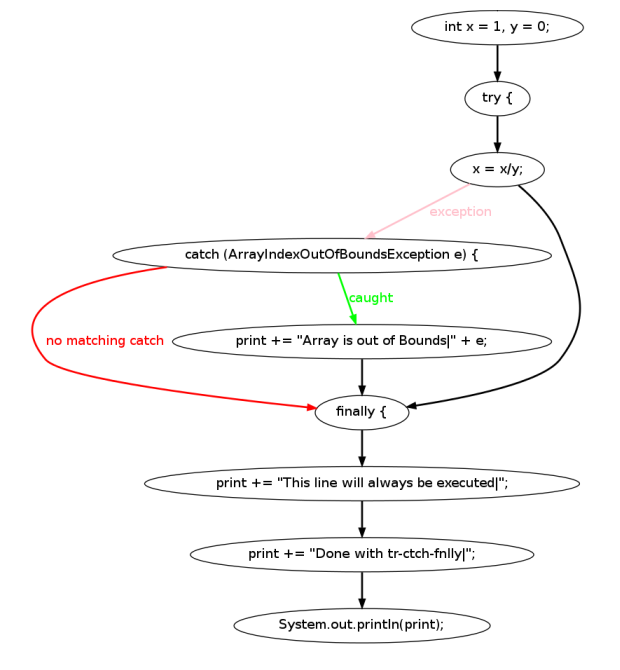
If there is no catch block that catches all exceptions, we need to realize that it is also possible that there is no matching catch for the potential exceptions.
int x = 1, y = 0;
try {
	 x = x/y;
}
catch (ArrayIndexOutOfBoundsException e) {
	print += "Array is out of Bounds|" + e;
}
finally {
	print += "This line will always be executed|";
}
print += "Done with tr-ctch-fnlly|";
System.out.println(print);
The program notices the lack of a catch block that catches all exceptions and realizes that the exception might not be caught at all. This is shown in the picture below using the "no matching catch" arrow.
Try...catch...finally vs. return statements
The program omits every code that follows a return statement, because no statements after a return statement will be executed. However, this is not always the case. A strange situation occurs where return statements occur inside a try or catch block. If a return statement occurs inside a try block, the rest of the try block will no longer be executed, but the code inside the catch and finally blocks will. Likewise, when a return statement occurs inside a catch block, the finally block will still be executed. Because this feels so counter-intuitive, many people do not agree that this is how it works. However, it can simply be fact-checked, by executing the following Java code:
int array[]={5,10,15};
try{
  return array[i];
}
catch (ArrayIndexOutOfBoundsException e) {
  return array[i--];
}
finally{
  if(i < 3){
    i++;
  }
  else{
    return array[0];
  }
}
This is a very complicated case, because:
- An exception might occur in the try block, but does not have to be.
- If an exception occurs in the try block, a new exception could occur in the catch block.
- The potential exception that occurs inside the catch block, could be fixed by the finally block (if i >= 3) due to the return statement being overwritten by the new return statement in the finally block. If i < 3 however, the exception from the catch block will keep existing
With all this in mind, the graph will look like this:
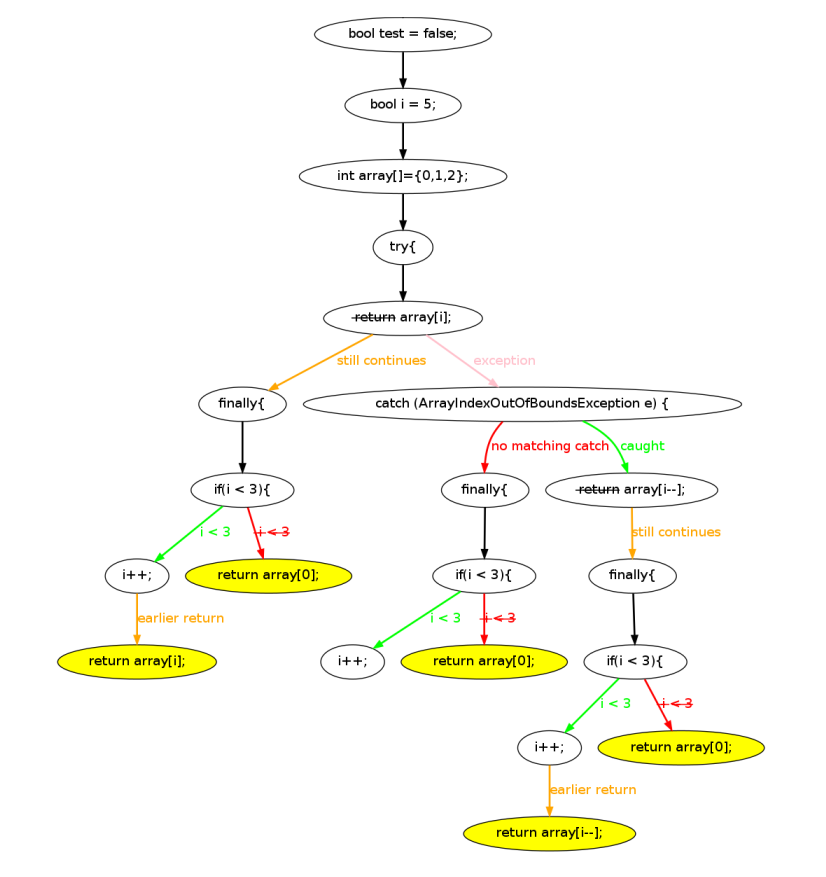
For a more elaborate explanation why this is the case, please refer to page 46 of the PDF.
Classes, methods and more
The program's capabilities extend far beyond the extensive number of images already showcased. In addition to the images, JShowFlow can interpret classes and their methods, generating interactive flow charts for classes. Clicking on a node with a class name will reveal the methods and their interactions. Furthermore, clicking on a method's node provides access to the control flow graph of the code within that method. For further information, please consult the PDF.
Throughout the process of building the software for generating control flow graphs from Java code, I gained mostly technical skills. Some of the key takeaways include:
- Code Interpretation:
I learned how to interpret Java code and convert it into a structured representation using C++ structs and pointers. This involved understanding various programming constructs, such as loops, conditionals, and method invocations. - Complex Scenarios Handling:
Handling various complex scenarios and multi-layered exceptions was a crucial challenge. I honed my problem-solving skills to ensure the generated control flow graphs accurately reflected the intricacies of the code. - Visualization Techniques:
I explored different visualization techniques to present the control flow graphs in a clear and understandable manner. Balancing simplicity and completeness proved vital in producing effective visualizations. - File Formats and Conversion:
I became proficient in working with the DOT language format to store the control flow graph information in a structured way. Additionally, I learned how to convert the DOT file into image formats like PNG or SVG for user-friendly viewing. - User Interaction:
The development process allowed me to understand the importance of user interaction in software design. I incorporated features to enable users to explore the control flow graphs interactively, enhancing their experience. - Problem Domain Knowledge:
The project deepened my understanding of control flow and graph theory, which are fundamental concepts in computer science. - Documentation and Communication:
I recognized the significance of clear documentation and effective communication when explaining technical concepts to a broader audience. The project's success relied on conveying complex ideas in an accessible manner.
Overall, the experience has contributed to my technical proficiency, problem-solving abilities, and software development skills. It has also taught me the importance of addressing real-world challenges while creating practical and user-friendly solutions.
Developing the software for generating control flow graphs from Java code not only enhanced my technical skills but also bolstered my non-technical skill of perseverance. Throughout the project, I encountered numerous challenges and faced moments of uncertainty when I didn't know how to proceed. The temptation to give up was strong, particularly during days of tirelessly searching for a bug that caused program crashes due to segmentation faults. However, my determination to overcome obstacles and refusal to quit drove me forward. Eventually, my perseverance paid off, resulting in a remarkably appealing and functional end product.
